Home>Student Guides>citrix-setup-students>Windows Guides to Citrix>add-and-enable-maori-keyboard
This page will show you how to enable and use the Maori keyboard layout in Citrix.
Add Maori Keyboard
- To get started click on the Windows Start button in the bottom left hand corner of your screen then select Control Panel on the right.

- When the Control Panel has opened, look for Clock, Language and Region. Select Change keyboards or other input methods.

- Select the Keyboards and Languages tab then choose Change Keyboard.

- On the General tab click on Add under Installed Services.
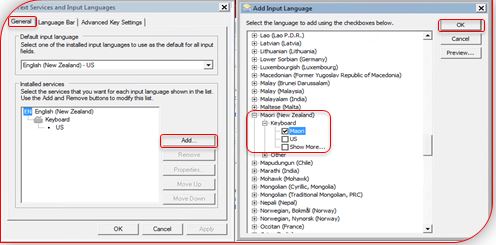
- After clicking on Add, the Add Input Language screen will open up. Look for Maori (New Zealand) and click on the plus sign (+) under Keyboard to expand.
- Check the box for Maori and click OK when done.
- Once the keyboard is added you will see MR Maori (New Zealand) showing in the list. Click OK to finish and exit out from all screens.

Enable Maori Keyboard
Now that the keyboard has been added, an easy way to enable it when you need it, is to select
MR Maori (New Zealand) from the Language Bar docked in the Taskbar.

NB: If MR is displayed in the Language bar with a tick beside it, this indicates that the Maori keyboard is active.
To include Macrons on vowels in Te Reo Maori, select the button on your keyboard with “~” showing, at the same time as you key a vowel.
